Here we go… another nail tutorial! DIY nail decals this time.

I first tried this DIY nail decal technique a couple weeks ago, with not very much success. ATTEMPT #1. EW SO UGLY. Since then I’ve tried the technique three more times and have come up with a few tips and tricks for you.
ATTEMPT #2

I painted a huge thick gradient of three colours onto a Ziploc bag. It was very smelly. I let it dry overnight.

I then cut out ten pieces, one for each nail. One nail at a time, I painted on base coat, let it dry for 10 seconds, then peeled my DIY nail decal off the plastic bag and stuck it on to my nail. I used my thumb of my other hand to smooth out the part that was actually touching my nail as much as I could.
Here’s where things started to get difficult: the decals were far too big for my nails. Ripping off the edges did not work, so I used nail clippers to trim off all the extras, but that was not very successful either. Probably those small nail scissors would work the best, but I don’t have any. Once I got all the major flaps off I used a q-tip with nail polish remover to dissolve the rest and clean up the edges as best I could.


Two coats of top coat later, that’s what I ended up with.
Oh by the way, I use Essie’s Good To Go top coat now because my Seche Vite has thickened up wayyy too much. Rip off. Anyway Essie’s isn’t AS super fast drying, but it’s still pretty good and it’s not becoming thick. I like to do one very quick coat of top coat, very light and gentle so nothing gets smeared underneath, and then after that has dried, a second coat just to make sure everything has been covered. This makes my nails extra extra shiny and incredibly durable.
Well anyway that manicure looked pretty cool but it took a long long time, and getting rid of the extra bits around the edges was super hard and I wasn’t pleased at how jagged some of them ended up.
ATTEMPT #3
My nails still looked fine, so I got Rosemarie to come over so I could try another idea out on her nails.
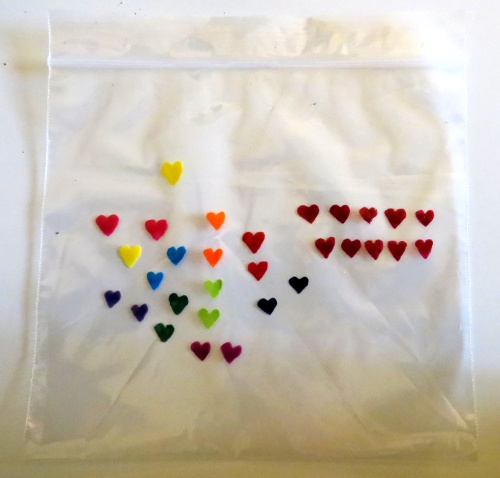
The night before, I painted 30 hearts on a ziploc bag (so she could choose what she wanted). Overnight drying seems to be good. If not overnight, at least let it dry for several hours!

She chose rainbow hearts, with gold underneath. I used pretty much the same technique as before: painted one nail at a time with the gold nail polish, then peeled off a little heart decal and carefully stuck it on her nail. I used a toothpick to push the edges of the hearts down gently. Once I finished all of the nails on one hand I went back and used my thumb to press the hearts down better.

Excuse her lizard skin please.

Two coats of top coat later she was done. There was much less clean up to do afterwards, no trimming necessary.
ATTEMPT #4
Rainbow nails, rainbow hearts + topcoat. I love it, I think it turned out pretty well!

It’s pretty neat how the two layers of nail polish end up fusing into one smooth layer. I haven’t had any cases of peeling whatsoever. The gradient manicure stayed on my nails for two full weeks, so it’s obviously nice and strong even considering you just stick it on to the nail as opposed to painting it on.
Tips & Tricks
– Thick is better than thin. Paint the nail polish on fairly thick on the Ziploc bag. I have not had any issues of the decals being too thick, but I HAVE had issues where the polish was too thin and the decal ripped.
– Probably best to just do little designs instead of the entire nail (the big decals were too much work, considering the results). Designs that have skinny or pointy parts (ie. stars) are going to be harder to peel off the bag than designs that are rounded (ie. hearts or circles).
– Do one quick light coat of top coat, then when dry do another coat, so you have less chance of smudging your hard work.
– You can use scissors to trim up your decals on the plastic bags after they are dry if you didn’t do a nice job of painting the designs.
– Let the decals dry for a while. At least a few hours! Also leaving my heart decals on the bag for a week did not seem to affect them at all.
That’s so cool! I never would’ve thought of making decals out of nail polish – reminds me of making chocolate decorations, lol.
rock climbing hands***
Try putting down a thick base of clear polish on the bag first (allow 30 – 45 mins for drying), then drawing your design on top of it. That way, when it’s dry, you can peel it up using the clear polish rather than the design, avoiding tears. Since the base is clear, it will blend seamlessly once you apply a layer of topcoat :)
ooh cool! nice tip! i guess that way you’d be able to paint more intricate designs. totally going to try this out soon, thanks!